REVIEW · TOKYO
Let’s make kimono !(Kimono is a gift for you
Book on Viator →Operated by Let's make kimono !(Kimono is a gift for you) · Bookable on Viator
A kimono that actually fits you. In this small Tokyo workshop, you pick from vintage patterns, get it adjusted to your body, and then learn the steps to wear it like you mean it—finished with photos and take-home results using a free obi rental included in the price.
My favorite part is the hands-on “make it yours” approach: you select a kimono design, your host helps you customize it to your size, and you’re not left guessing. I also love the friendly guidance from the staff—many sessions are run with clear English support, and I kept seeing the name Oto Ha pop up for help and patience.
One thing to consider: upgrades cost extra (especially more ornate options), and because the kimonos are vintage, you might encounter minor stains or wear in some areas—so check how you feel about that before you go all-in on a particular fabric.
In This Review
- Key things to know before you go
- Finding the studio in Kiba (and why it feels more real than a storefront)
- What the $43.11 price really buys (and what costs extra)
- Women’s, men’s, and kids kimono: three different ways the class plays out
- Women’s kimono: choose, customize, wear, photo time
- Men’s kimono: name in Kanji and extra ironing help
- Kids: different itinerary and a simpler fit for some
- The workshop flow: what you do with your hands (and what you’ll learn)
- Obi, obiage, obijime: why the “finishing bits” matter
- Photo time: how to get better results fast
- Vintage fabric reality check: possible stains and how to think about them
- Budget reality: upgrades are normal, but you can stay in control
- Who this is best for (and who should skip it)
- Should you book Let’s make kimono ! ?
- FAQ
- How long is the kimono workshop?
- How many people are in the group?
- Is an obi included?
- Can I upgrade to a more ornate kimono?
- Do men’s and women’s sessions work the same way?
- Are kids allowed to join?
- Are Japanese sandals and tabi included?
- Where do I meet, and does it end there too?
- What if the weather is bad?
Key things to know before you go

- Small group (max 5): more help when you’re figuring out the fit and the wrapping steps.
- Free obi rental included: you get the finishing piece even if you don’t upgrade.
- Vintage kimono selection: lots of pattern variety, with some pieces costing more for higher-end fabric.
- Different formats for women, men, and kids: personalization details change by session type.
- Photos are part of the experience: you leave with a finished look, not just a class memory.
- Make-and-take feel: the goal is to remake the kimono into a wearable keep-sake.
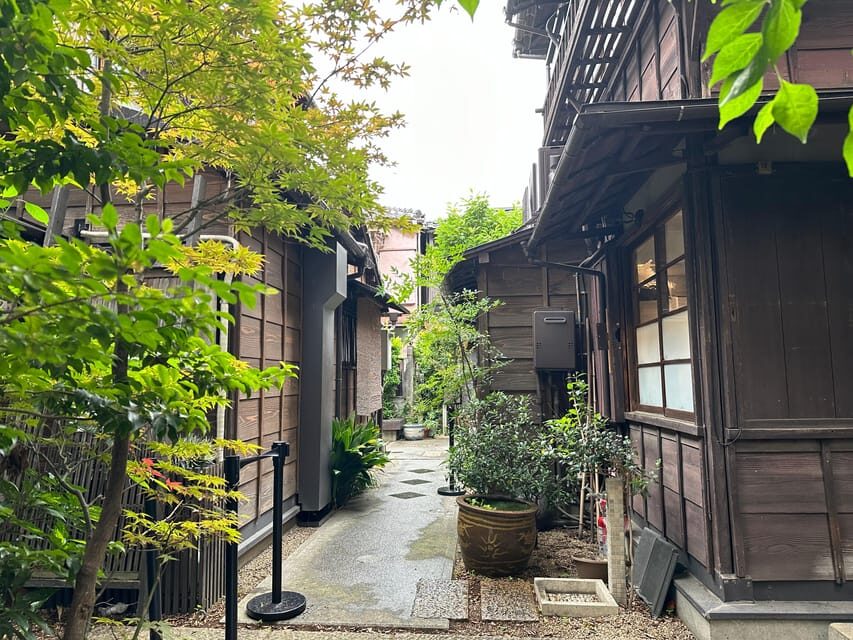
Finding the studio in Kiba (and why it feels more real than a storefront)

The meeting point is a residential address in Kiba, Koto City: 6-chōme-8-6 Kiba, Koto City, Tokyo 135-0042. The workshop ends back at the same place, so you’re not hopping across town. It runs about 1 hour 30 minutes, and the experience is available in morning or afternoon sessions so you can plan around other Tokyo stops.
This is one of those activities where you can end up thinking you’re at the wrong place—until you walk inside and realize it’s exactly the point. Instead of a crowded tourism counter, you’re in a small studio setting with a calm, practical workflow. That matters because kimono fitting is detail work. More time with the people helping you usually means fewer awkward pauses when the fabric stops cooperating.
Also worth noting: the tour uses a mobile ticket, it’s near public transportation, and it’s designed so most people can participate. If you need support with a service animal, service animals are allowed.
You can also read our reviews of more tours and experiences in Tokyo.


What the $43.11 price really buys (and what costs extra)
The price is listed at $43.11 per person, and the experience includes a lot of the “costly-looking” items you’d expect only at higher-priced cultural add-ons. You receive the kimono and a free obi rental. You also get obiage, obijime, and an obi pillow as free rentals (with the option to purchase them).
Not included: Japanese sandals and tabi. So plan to wear normal footwear to arrive, and don’t assume you’ll be handed the full traditional foot kit.
Now, the smart part: not all kimono options are priced the same. For women’s kimono, you can start with a basic kimono included, and you can upgrade for a more ornate option with an additional charge (listed as JYP 2,000 to 6,000 for upgraded kimono). For men, you can also choose your kimono, but a haori + kimono set is an additional JYP 2,000.
That means the upfront price is good value if you’re happy with the included selections. It also means you can control your budget instead of being forced into a single “package kimono” with no choices.
Women’s, men’s, and kids kimono: three different ways the class plays out

This experience includes options for women’s, men’s, and children’s kimono. What changes is the level of customization and the exact personalization method. That’s helpful because kimono isn’t one-size-fits-all, especially when you’re tailoring for comfort and fit rather than just putting on layers.
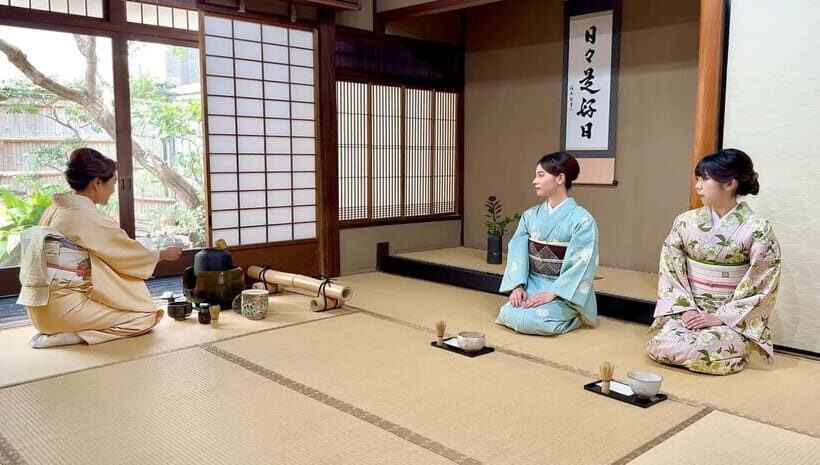
Women’s kimono: choose, customize, wear, photo time
You select a kimono you like (basic included; upgrades cost extra), then the staff helps customize it to your size. You’ll learn how to wear it, and there’s photo time once you’re in the finished look. If you’re picky about patterns, you’ll likely enjoy the selection process because you’re making a real choice—not just getting dressed in whatever is ready.
Men’s kimono: name in Kanji and extra ironing help
Men’s kimono adds a personalization touch. You choose the set, and then you print out your name in Kanji and choose the color of the font. The process also includes ironing on the kimono, which is a big deal for getting a crisp, intentional look. There’s also that note: for men, the haori + kimono set has an extra JYP 2,000 charge.


Kids: different itinerary and a simpler fit for some
Kids can join too, but the kids sessions are described as having a different itinerary than the women’s kimono path. For girls, some children’s kimono options don’t require adjustment, meaning you can wear them without cutting the material. For boys, the customization includes printing the name in Japanese on the collar of the kimono.
If you’re traveling with kids, this flexibility can be a plus. You’re more likely to get a session that matches the child’s needs rather than cramming a one-method adult workflow into a kid’s time slot.
The workshop flow: what you do with your hands (and what you’ll learn)
This is a practical class. You’re not just watching someone else do all the work while you stand by. You’ll actively participate in fitting and making the kimono into something wearable for your body.
In the women’s path, the experience is built around selection, sizing, and learning the wrapping steps, with photo time at the end. Several people highlight that the techniques are straightforward in the time you’re given, and the setting is comfortable enough that you won’t feel rushed into doing a perfect job.
There’s also an “easy-wear” angle that shows up in how people describe the result. Instead of handing you a static costume, you’re remaking a vintage kimono into an easier-to-wear version. Some guests describe leaving with pieces that can be worn separately or together, which is exactly the kind of practical souvenir that gives you more use later.
One more real-world tip: be prepared to work through the fitting process, which can involve handling fabric, folding, and ironing steps. If you have knee or mobility concerns, it’s smart to think about the physical posture you can manage for a while.
Obi, obiage, obijime: why the “finishing bits” matter
The obi rental is one of the best value features here. You’re not waiting to see if the obi is included—it is. For many people, the obi is what turns a “nice outfit” into a true kimono look, because it shapes the silhouette and adds that bold visual center.
You also have free access to obiage, obijime, and an obi pillow as rentals. These sound small, but they’re the kind of details that affect how the layers sit and how polished the final look feels.
If you decide you want a more specific or higher-end accessory look, the rental items can be available for purchase. That means you can start with the included basics and then upgrade only if you genuinely love the option in front of you. It’s a better setup than a fixed “pay more or you don’t get the full outfit” situation.
Photo time: how to get better results fast

Photo time is built into the end of the fitting session. The goal is that you leave with a finished look and images that show your final kimono style. Many people appreciate that the staff takes photos for you, and some mention getting photos sent after when their phone battery wasn’t cooperating.
For best results, you’ll want to lean into the “finished outfit” mindset. Even if you’re not used to wearing layered fabric, the staff will guide you into the correct placement so you don’t spend the photos wrestling with fit.
This is also why the small-group limit helps. When there are fewer people, the staff can slow down if you need an extra minute to straighten things out before the shutter clicks.
Vintage fabric reality check: possible stains and how to think about them
Because the kimonos are vintage, there’s an important note in the experience info: you might find stains in some areas. That can sound alarming, but it’s also realistic—vintage textile life has wear. The key question for you is whether those marks would bother you enough to change the choice you make.
If you’re the type who hates visible imperfections, treat the selection step seriously. If you’re more focused on pattern and overall look, you may find the vintage character part of the charm. Either way, this consideration is worth bringing into your decision early rather than discovering it only after you’ve fallen in love with a particular design.
Budget reality: upgrades are normal, but you can stay in control
The class is priced accessibly, but the experience is also designed so you have options. The included kimono choices won’t always match the exact fabric level you might want, and that’s why upgrades exist.
Here’s what the data says about typical upgrade costs:
- Women: upgraded ornate kimono options add JYP 2,000 to 6,000
- Men: haori + kimono set adds JYP 2,000
- Obi-related items: free rental is included, with purchase available
In practice, people often end up paying extra for a more elaborate setup. That can still be good value if you care about the “wow factor” and you want the accessory pieces to match your chosen look. The tradeoff is simple: if you want a fully no-extra-cost experience, stick with the basic included kimono option and plan to use the free obi rental.
Who this is best for (and who should skip it)
This is a strong fit if you want:
- A hands-on kimono experience where you actually learn and participate in the fitting process
- A take-home keep-sake rather than only getting a photo costume
- A smaller, calmer alternative to generic rental shops
- Options for kids with children’s kimono sessions available
It may be less ideal if you:
- Expect a long, structured lecture focused mainly on deep kimono tradition details
- Want a perfectly “new, flawless” outfit with zero vintage imperfections
- Only want one fixed, no-upcharge outfit regardless of what you like visually
Should you book Let’s make kimono ! ?
I’d book it if your priority is a practical, creative experience where you pick a vintage pattern, get it tailored, learn the basics of how to wear it, and walk away with something you can enjoy again later. The free obi rental is a real value win, and the max 5-person format makes the help feel personal instead of rushed.
I’d pause if you’re sensitive to vintage wear and you hate the idea of stains in some areas. Also pause if you’re trying to avoid any add-on costs: the experience is built so upgrades exist, and you may decide to pay more for the look you want.
If you’re comfortable with that tradeoff, this is one of the more satisfying “do something in Tokyo” activities—creative, photo-worthy, and grounded in real making rather than just dressing.
FAQ
How long is the kimono workshop?
The experience runs about 1 hour 30 minutes.
How many people are in the group?
The group size is limited to a maximum of 5 travelers.
Is an obi included?
Yes. A free obi rental is included. Obiage, obijime, and an obi pillow are also available as free rentals.
Can I upgrade to a more ornate kimono?
Yes. You can choose a basic kimono or upgrade for a more ornate option. For women, upgraded kimono options are listed as an additional JYP 2,000 to 6,000.
Do men’s and women’s sessions work the same way?
They are similar in that you select a vintage kimono and get help with making it wearable, but men’s sessions include name printing in Kanji and a haori + kimono set may cost extra (JYP 2,000).
Are kids allowed to join?
Yes. Children can join with children’s kimono experiences. Children’s sessions have a different itinerary from women’s, and boys and girls have different personalization details.
Are Japanese sandals and tabi included?
No. Japanese sandals and tabi are not included.
Where do I meet, and does it end there too?
You meet at 6-chōme-8-6 Kiba, Koto City, Tokyo 135-0042, Japan, and the activity ends back at the meeting point.
What if the weather is bad?
The experience requires good weather. If it’s canceled due to poor weather, you’ll be offered a different date or a full refund.