REVIEW · TOKYO
Special sushi rolls only available in Japan Making Experience
Book on Viator →Operated by 優美会 · Bookable on Viator
Design sushi that actually looks like a character.
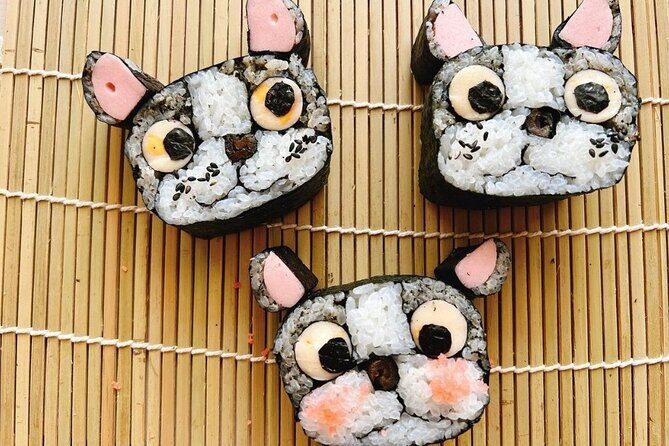
In this private class with one-to-one tuition, you make photogenic rolls with colored rice and cut-seaweed detail, then see your pattern show up when the roll is sliced. A key drawback to keep in mind: the default meetup is at Shinkashiwa (Chiba), so plan for travel time unless you request a kitchen setup closer to Tokyo.
What makes it especially fun is that you’re not stuck with one “standard” roll. You can choose playful themes like minions, dogs, cats, flowers, and Mount Fuji scenes, ask questions while you work, and then enjoy coffee, tea, and snacks before heading back to the pickup point.
In This Review
- Key highlights to look forward to
- Where the class starts: Shinkashiwa vs a Tokyo kitchen
- What you’ll actually make: designer maki rolls with visible patterns
- Step-by-step flow: the 2-hour rhythm (and why it works)
- Choosing a theme: minions, animals, flowers, and Mount Fuji scenes
- Private home kitchen setup vs communal kitchen
- The instructor touch: Yumi’s step-by-step guidance
- Getting to taste, then getting to take home
- Price and value: what $40.97 buys you in real terms
- Who should book this sushi-making class (and who might not)
- A quick reality check: logistics that affect your experience
- Should you book this sushi-making class?
- FAQ
- How long does the sushi-making experience last?
- Is this a private class?
- What will I make during the class?
- Can I take the sushi home?
- Where does the class start and where does it end?
- Can the class be held closer to central Tokyo?
- Is there free cancellation?
Key highlights to look forward to
- One-to-one instruction so you’re not waiting your turn while the good stuff happens
- Colored rice + decoration step that turns basic maki into a design project
- Pattern reveal when you cut the roll into four pieces so you can see what you made
- Take-home wrapping and containers so your sushi doesn’t end with the class
- Private setting with time for questions and a more relaxed pace
- Flexible kitchen location requests with options near Asakusa and Skytree
Where the class starts: Shinkashiwa vs a Tokyo kitchen
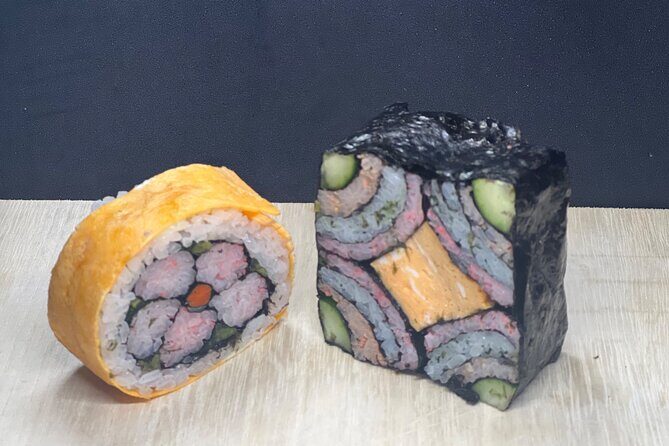
The class is built around a simple meeting-and-go plan, but where you meet matters for your day in Tokyo.
Your starting point is listed at Shinkashiwa Clinic (1-chōme-4-5 Shinkashiwa, Kashiwa, Chiba). That’s not in central Tokyo, so if you’re staying deep in the city you may spend some time getting there—time you won’t have back once the 2-hour session starts.
Here’s the good part: the experience can also be done in Tokyo. The host notes that kitchens can be rented for a fee, and suggests areas near Asakusa and Skytree. If you want something closer to where you’re sightseeing, make a special request where you’d like to enter/hold the class early. It’s the difference between fitting this into a busy itinerary versus treating it like its own mini excursion.
Also note the pace after the lesson: you’ll be taken back to the pickup point when it ends. So you’re not left hunting for your own ride at the end—nice when you’ve still got plans for the evening.
You can also read our reviews of more tours and experiences in Tokyo.



What you’ll actually make: designer maki rolls with visible patterns
This isn’t a “watch and then lightly assemble” situation. You’re doing the work—mixing, cutting, building, rolling, and finishing.
You’ll begin by mixing sushi rice and ingredients to create colored rice. That step is what makes the whole design concept possible. Plain white rice is fine for standard maki, but colored rice lets you build shapes, sections, and recognizable themes without needing fancy tools.
Next comes seaweed prep and assembly:
- You’ll cut the seaweed.
- You’ll layer colored rice and decorations into the roll-building process.
- You’ll roll it up so the design stays intact.
The best moment is later: you’ll cut the finished roll into four pieces. That’s when you see the pattern you made—like a flower, an animal, or a character-style design. The class is clearly set up so you get the instant payoff, not just a finished roll that you hope looks good at home.
After cutting, you’ll wrap the sushi so it’s ready to take with you. So you get both the satisfaction of making it and the practical reward of eating it later.
Step-by-step flow: the 2-hour rhythm (and why it works)
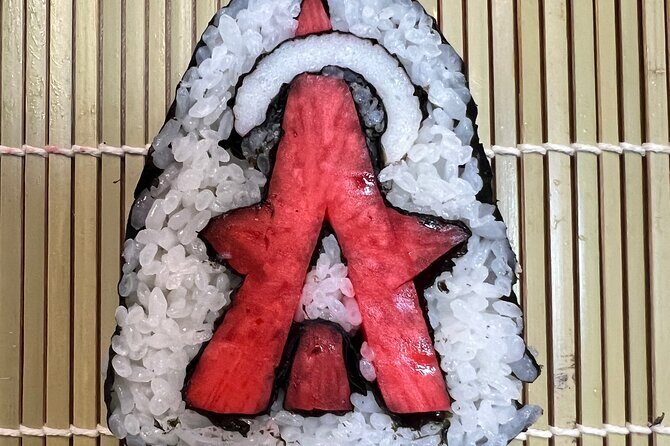
The duration is about 2 hours, which is a sweet spot. Long enough for you to get real practice, short enough that you’re unlikely to feel exhausted or rushed.
Expect the session to move in a predictable order:
- Colored rice mixing: you’ll blend rice with ingredients used to create the colors.
- Seaweed cutting: you’ll handle the sheets and prep them for assembly.
- Build the design: add colored rice and decorations in a way that creates your theme.
- Roll and set: you shape it so it holds together.
- Slice into four pieces: the pattern reveal.
- Wrap for takeout: so your work travels well.
- Relax with coffee, tea, and snacks: a small downshift before you head back.
The step-by-step nature matters because sushi rolling is mostly technique and timing. When guidance is clear and frequent, your hands learn faster. And because this is private, you can ask questions in the moment instead of trying to remember what someone said earlier.
Choosing a theme: minions, animals, flowers, and Mount Fuji scenes
You’ll have options for imaginative designs. The experience highlights themes like:
- minions
- flowers
- Mount Fuji scenes
- dogs and cats
In one class setup, Santa-style sushi was specifically mentioned, which tells you the instructor is comfortable with character designs and seasonal ideas too.
Picking your theme is more than choosing what looks cute. It also affects how you plan your internal layers. Colored rice becomes your building blocks, and the placement of decorations determines whether your final slices read clearly as the design you wanted.
If you’re deciding what to choose, here’s a practical approach:
- If you want the most “wow” moment when cut pieces appear, go for a theme with clear shapes (like animals or flowers).
- If you want something fun and recognizable fast, character designs can be easier to spot in a single glance.
- If you’re choosing Mount Fuji, think of it as a scene: you’re not only making it pretty—you’re trying to make the theme legible in four slices.
The class makes it photogenic on purpose. You’ll be creating something that’s designed to be seen, then packed up, which is why the pattern reveal step is central.
Private home kitchen setup vs communal kitchen
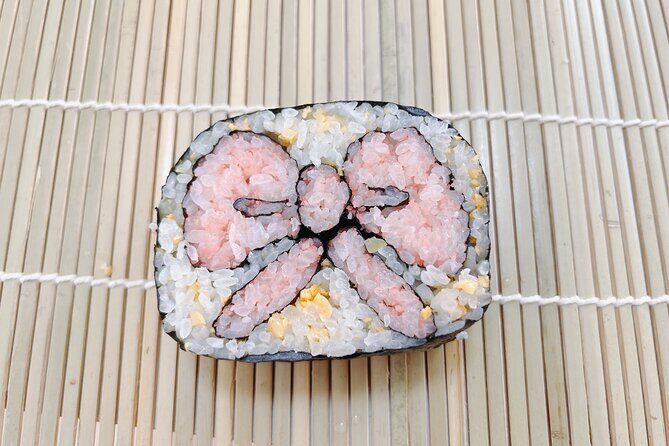
One of the most interesting details is where the lesson happens after you meet.
If you book for a small number of people, you’ll head to the host’s parents’ house kitchen. For larger groups, you’ll go to a communal kitchen. Either way, the experience stays private in the sense that only your group participates.
Why you should care about this: the environment changes how the class feels. A home kitchen setup often feels more relaxed and personal. A communal kitchen can be more structured and practical, especially if the kitchen layout is designed for lessons.
So if you prefer a calmer, homey vibe, consider booking when your group size is likely to be small. If you’re coming with more people and want everyone to be together in a dedicated teaching space, a larger-group communal kitchen setup can keep things organized.
Also, the guide and any helpers are part of the experience—not just background. One class described Yumi teaching step by step patiently, and another noted Yumi and friends being accommodating with two young daughters. That’s a good sign if you want a patient, friendly pace.





The instructor touch: Yumi’s step-by-step guidance
The experience centers on a sushi teacher, and Yumi is named as the guide in feedback. The consistent message is that Yumi teaches patiently and walks you through each move, especially if it’s your first time making maki.
That matters because sushi rolling has a few tricky points:
- getting the rice distribution right
- keeping layers stable
- rolling evenly so the design doesn’t distort
- making the final slice reveal make sense
When the instruction is calm and frequent, you’re more likely to end up with something that looks like the idea you picked—not just something edible.
And because it’s private, you can ask questions as you go. That reduces the common stress of hands-on classes where you’re trying to figure things out while everyone else is moving ahead.
Getting to taste, then getting to take home
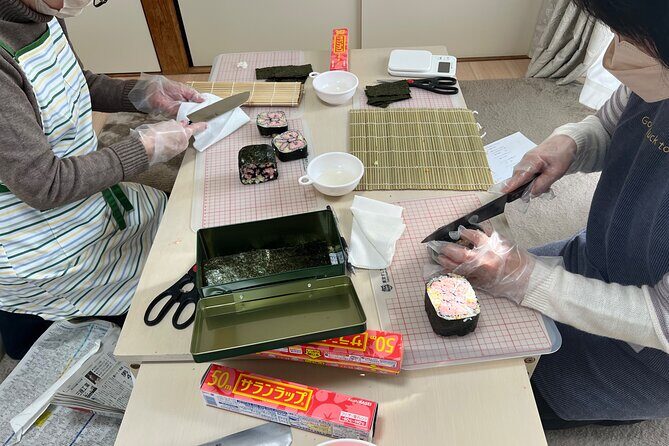
Most sushi experiences feed you in the moment. This one does something extra: it includes takeout.
After you wrap your rolls, takeout containers are provided. That’s a huge practical win in Tokyo, where you might not want to eat in class and then immediately hunt for somewhere to sit later.
Coffee, tea, and snacks are served afterward as a relaxing buffer before pickup. It turns the lesson into an experience, not just a production line.
Two practical tips for enjoying your take-home sushi once you’re back:
- Treat it like a lunch you made carefully, not like fast food. Keep it stored properly and eat it soon after.
- If you want to recreate the “pattern reveal” photo, take one quick look at the sliced pieces before you pack everything away. That’s the moment your design is most obviously what you intended.
Price and value: what $40.97 buys you in real terms
At $40.97 per person for a roughly 2-hour private class, the price can feel “reasonable” or “steep” depending on what you compare it to.
Here’s the value angle that makes this make sense:
- Private, one-to-one tuition: you’re paying for direct teaching time, not just a demo.
- All ingredients are provided: you don’t need to buy rice, seaweed, decorations, or tools.
- You create themed rolls: the colored rice and design approach is a step up from basic maki rolling.
- You leave with your sushi: take-home containers convert your class into both an activity and a meal you can control later.
- Snacks and drinks: the class ends with coffee, tea, and snacks, adding comfort after hands-on work.
Also, timing matters. The experience is often booked about 56 days in advance on average. If you want a particular kitchen location request or you’re traveling during busy weeks, it’s smarter to lock it in early. Popular hands-on classes tend to fill quietly.
So if you’re the type who likes doing one or two standout “skills” activities on a trip, this is a solid use of money. If you just want a quick novelty snack without learning anything, you might feel the cost more than the benefit.
Who should book this sushi-making class (and who might not)
This class is a great match if:
- you’re making sushi for the first time and want patient, step-by-step guidance
- you like cute, themed designs and want a roll that looks good in photos
- you enjoy hands-on cooking more than watching
- you want something private where you can ask questions without pressure
- you want a takeaway meal that doesn’t depend on finding dinner plans
It may be less ideal if:
- you hate travel time outside central Tokyo, because Shinkashiwa is where the default meetup is
- you want a super casual “drop in and eat” experience—this is a real class where you’ll be actively building rolls
A small extra note: accommodating young daughters was mentioned in one class description. That suggests the teaching style is patient and people-friendly, even with kids present. Exact age rules aren’t stated here, though—so if you’re bringing children, ask in advance what the instructor prefers.
A quick reality check: logistics that affect your experience
A few practical details can change how smooth your day feels.
The biggest one is location. If you’re staying in Tokyo proper, seriously consider requesting a kitchen near Asakusa or Skytree. If you don’t, you’re likely to spend time getting to Shinkashiwa.
Second, plan your schedule around the 2-hour duration. It includes meeting, making, slicing, wrapping, and the coffee/tea/snack time. If you stack it right before a long train transfer, you’ll feel rushed.
Third, because it’s a private activity, your group experience will be more focused. That’s a plus, but it also means you’ll want clear communication about the theme you want and any special requests about the kitchen location.
Should you book this sushi-making class?
Book it if you want a Tokyo-area cooking experience that’s hands-on, guided, and designed to produce something you can actually show off—then take home. The standout strengths are the one-to-one instruction and the designer roll format where your pattern becomes visible when the roll is cut into four pieces.
Skip it or approach with caution if your schedule can’t handle the Shinkashiwa commute. The Tokyo-kitchen option near Asakusa/Skytree is the way to make it work smoothly, but you need to request it.
If you like thoughtful fun with real technique—and you want sushi that looks like art rather than just food—this class is an easy yes.
FAQ
How long does the sushi-making experience last?
It lasts about 2 hours.
Is this a private class?
Yes. It’s a private experience, and only your group participates.
What will I make during the class?
You’ll make sushi rolls with imaginative designs. The class includes mixing colored rice, cutting seaweed, adding decorations, rolling, and then slicing the roll into four pieces to reveal the pattern you created.
Can I take the sushi home?
Yes. The rolls are wrapped for takeout, and takeout containers are provided.
Where does the class start and where does it end?
It starts at Shinkashiwa Clinic (1-chōme-4-5 Shinkashiwa, Kashiwa, Chiba 277-0084, Japan) and ends back at the meeting point.
Can the class be held closer to central Tokyo?
Yes. The host says kitchens can be rented for a fee, and they suggest areas near Asakusa and Skytree. You should add a special request for the area you want.
Is there free cancellation?
Yes, free cancellation is available up to 24 hours in advance of the experience start time.