REVIEW · TOKYO
Tokyo Cyberpunk Street Photo Tour
Book on Viator →Operated by EYExplore Tokyo · Bookable on Viator
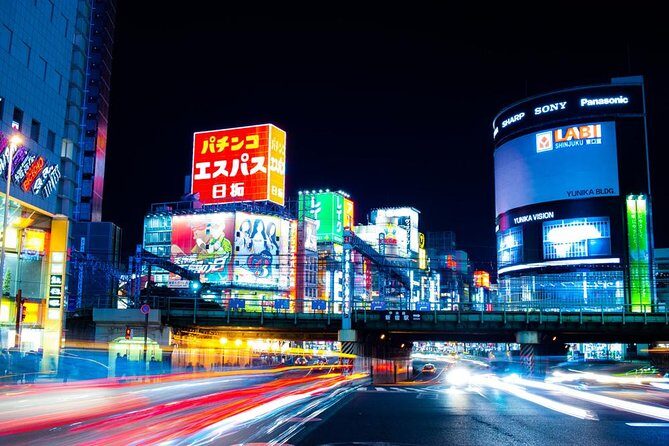
Neon at night makes Tokyo feel like sci-fi. This Tokyo Cyberpunk Street Photo Tour turns neon-sign photography into a guided street-session through Shinjuku and Shibuya, with small-group coaching for both cameras and smartphones. You’ll practice composition, learn long-exposure tricks, and end at the Shibuya Crossing for that film-famous, moving-mass effect.
You’ll start in Shinjuku near the Happy Lemon Keio Shinjuku Shop at 7:00pm, then work your way through Kabukicho, Omoide Yokocho, and finally Shibuya Crossing. The photo instruction is hands-on, and guides like Charles and Lukasz are praised for patient, practical feedback. The only catch is pace: a couple of past participants noted the walk can be fast, and if you fall behind or struggle to find the group in a big station area, you can lose valuable shooting time.
In This Review
- Key Points Worth Your Time
- Tokyo Cyberpunk Street Photo Tour: The Real Vibe at 7pm
- Shinjuku’s Kabukicho Glow: Stop One and the Fastest Learning Curve
- Omoide Yokocho Memory Lane Photos: Texture, Signs, and Street Life
- The Train Moment to Shibuya: You Pay, but You Gain the Right Scene
- Shibuya Crossing After Dark: The Long-Exposure Reality Check
- Phone or Camera: The Teaching That Makes Night Photos Easier
- Meet Charles and Lukasz: Small-Group Feedback That Sticks
- Price and Value: $184.99 for Up to Two People
- Logistics That Actually Matter: Meeting Point, Walking Speed, and Timing
- Who This Tour Suits Best (and Who Might Not)
- Should You Book This Tokyo Night Photo Tour?
- FAQ
- How long is the Tokyo Cyberpunk Street Photo Tour?
- What time does it start, and where does it meet?
- Where does the tour end?
- How many people are in the group?
- What neighborhoods and photo stops are included?
- Is the tour suitable if I don’t have photography experience?
- What’s included in the price?
- Is any transportation cost included?
Key Points Worth Your Time
- Neon-focused stops: Kabukicho, Omoide Yokocho, then Shibuya Crossing for peak Tokyo-at-night energy
- Long exposure practice: you’ll learn how to get glowing lights while dealing with moving crowds
- Camera and smartphone friendly: tips cover both dedicated cameras and phones you already have
- Max 4 people: small-group format means feedback and attention stay personal
- Real-world guide help: pros help you frame faster and adjust settings on the fly
- Weather-aware planning: when rain happens, the guide may shift plans so the night still works
Tokyo Cyberpunk Street Photo Tour: The Real Vibe at 7pm
This is a night street photography tour built around one simple idea: Tokyo lights are at their best after dark, and you’ll photograph more (and better) when someone shows you where to stand and what to change. It’s also intentionally short—about 2.5 to 3 hours—so you’re not spending half your evening commuting and half waiting.
I like that it’s practical rather than talk-heavy. You’re not hunting for museum history; you’re learning how to make neon signage, reflections, and human motion look intentional. If you want cyberpunk-style frames—glow, contrast, and crowd energy—this tour aims right at that.
Price-wise, it’s listed at $184.99 per group up to 2 people. For a pro-led shoot session with guided timing in two of Tokyo’s most photogenic nightlife districts, that can be good value—especially if you’re traveling with a partner or friend who’ll share the cost.
You can also read our reviews of more photography tours in Tokyo

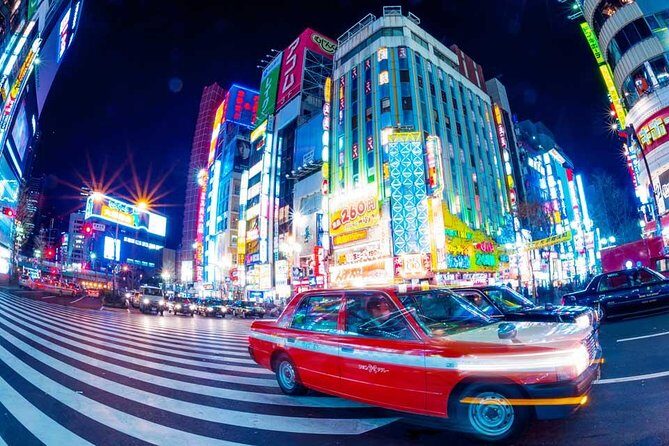
Shinjuku’s Kabukicho Glow: Stop One and the Fastest Learning Curve
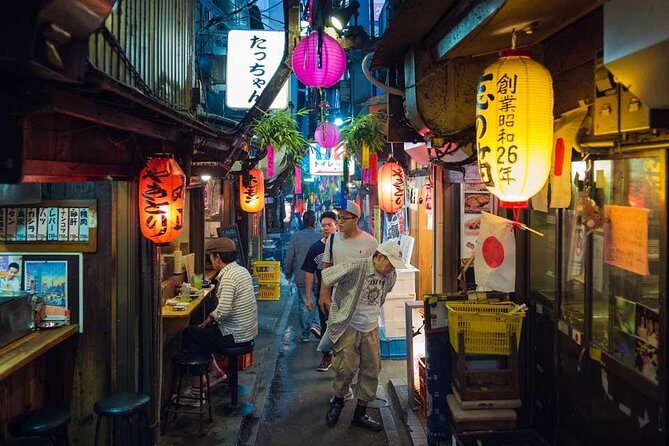
Your first stop is the Kabukicho District for about 1 hour. This is one of Tokyo’s most neon-dense zones, and it’s a smart place to start because the visual mix is immediate: bright signs, deep shadows, busy streets, and lots of small moments.
This is where you’ll likely focus on the fundamentals that make night photos work:
- framing neon without washing everything out
- using shutter speed choices to control blur
- finding angles where signs reflect in wet pavement (when it happens)
- positioning so crowds don’t destroy your composition
Kabukicho can feel overwhelming at first—too much light, too many directions, too many people. That’s exactly why a guide matters. You get “where to stand” guidance, not just general tips, so you can start taking shots sooner instead of spending your hour thinking.
One caution: a couple of past participants mentioned the group can move quickly. If you’re the type who likes to pause, review your screen, and reshoot, bring that energy up front with the guide. Ask for an extra minute when you need it, because this tour is timed for specific lighting moments.
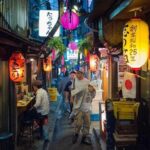
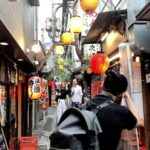
Omoide Yokocho Memory Lane Photos: Texture, Signs, and Street Life
Next you head to Omoide Yokocho (Memory Lane) for about 30 minutes. This is a different kind of night scene than Kabukicho: it’s more alley-like, with a tighter feel and strong texture. Instead of only chasing big neon, you can photograph smaller details—signage, doorways, and candid street life.
This stop is short, so it rewards people who can act fast. If you want pictures that feel lived-in (not just glowing billboards), pay attention to composition:
- include the lane lines to pull the viewer forward
- watch for bright sign edges against darker areas
- look for faces in motion, then use timing to make them readable
Also, alley photography is where smartphone shooters often benefit most. Your phone can still capture a lot of color and light, and a good guide can show you how to use modes and sliders to stop your image from looking like a blurry glow blob.
If rain hits or the air feels different, this lane-style stop can still deliver. It’s not just “big lights” photography; it’s also “street storytelling” photography.
The Train Moment to Shibuya: You Pay, but You Gain the Right Scene
After Shinjuku, you travel by train to Shibuya at your own expense. The tour doesn’t include bus fare, and that transfer cost is a small line item—but it matters because it puts you in the right place for the climax.
This part is also a mental shift. In Shinjuku, you’re often framing by signage and side streets. In Shibuya, you’re framing by crowd flow—how people move through a fixed space and how that movement turns into texture in your photo.
If you’re photographing with a camera, this is a good time to re-check your setup (lens choice, exposure settings, and whether your phone is locked to the look you want). If you’re shooting with a smartphone, it’s a good moment to confirm you’re using the same app controls you practiced earlier—so you’re not changing settings at the worst time.
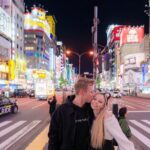
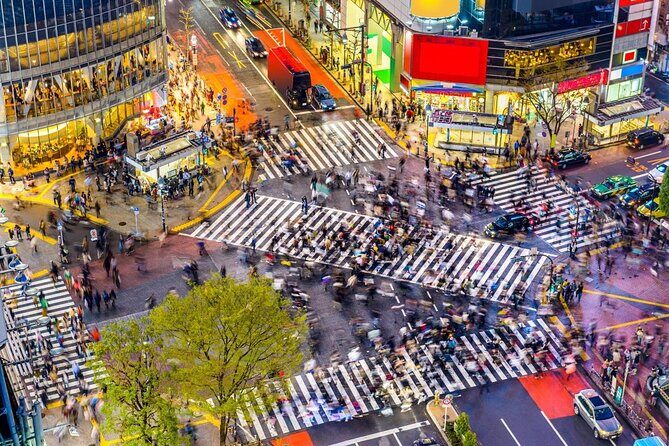
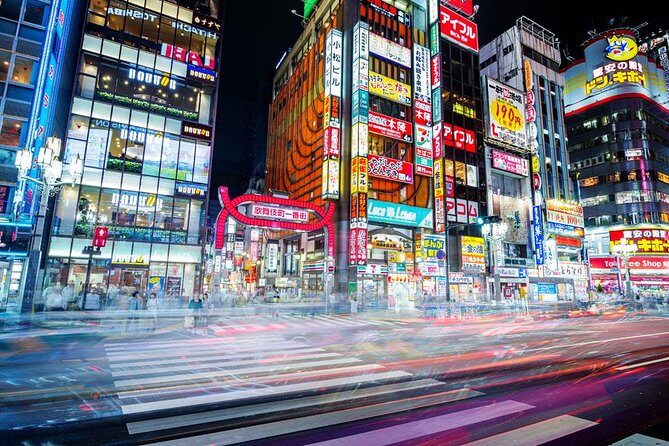
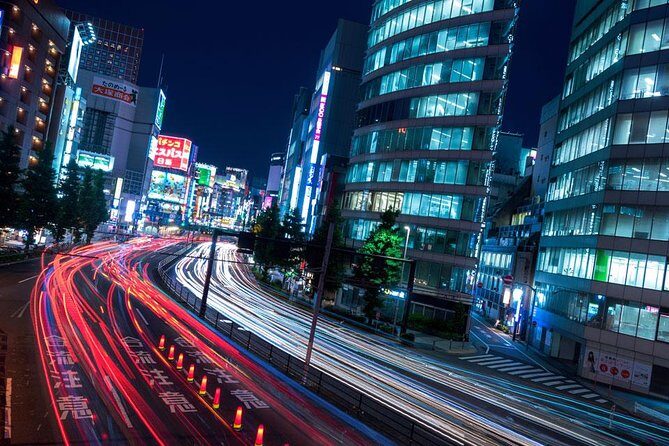
Shibuya Crossing After Dark: The Long-Exposure Reality Check
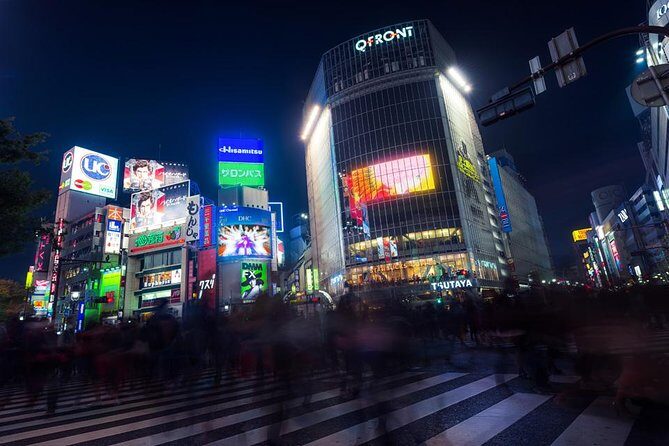
You finish at Shibuya Crossing for about 45 minutes, and yes—the intersection is famous in pop culture, including Blade Runner-style sci-fi vibes. What makes it great for photos is also what makes it hard: thousands of people, synchronized movement, constant light changes, and glare from signage.
Long exposure is the main trick here. The goal is to make the crowd look fluid or ghosted while keeping key elements (like signage) readable enough to feel crisp. That means you’ll need to balance:
- shutter speed long enough for motion trails
- exposure control so highlights don’t turn into featureless white
- angle choice so your frame has direction
This stop can deliver dramatic results even if you don’t call yourself a photographer. With a guide, you learn how to treat the scene like a single composition rather than a chaotic snapshot moment.
One more practical note: Shibuya Crossing can be packed. If the group pace is brisk, arriving with your phone/camera ready helps. When you’re not fumbling with menus, you get more cycles of “shoot, adjust, shoot again,” which is where quality improves.


Phone or Camera: The Teaching That Makes Night Photos Easier
This tour is built for camera people and phone people. In the feedback, the guides are praised for making phone photography feel less mysterious. One recurring theme is that you’ll get direct, step-by-step advice for settings and controls—things like contrast adjustments and quick ways to lock or stabilize your phone’s behavior so you don’t accidentally ruin your shot while you’re trying to frame.
For camera users, you’ll get help with real night settings rather than vague tips. Expect guidance that points toward:
- using manual or semi-manual control so shutter speed and exposure are intentional
- choosing settings that keep neon from blowing out
- practicing long exposure while the scene is moving
Tripods come up too. A review noted that bringing a camera with some shutter-speed/exposure control helps, and having a tripod was suggested. You don’t have to show up with pro gear—but if you own a tripod or mini tripod, it can help you get steadier long-exposure frames at Shibuya Crossing.
The bigger benefit is that you learn why the settings matter. Night photography stops feeling like luck when you understand what you’re changing and what the result should be.
Meet Charles and Lukasz: Small-Group Feedback That Sticks
A lot of the strongest notes in the reviews revolve around the instructor style. Charles and Lukasz are repeatedly described as friendly, patient, and focused on making sure you’re actually getting the shots—not just walking by them.
Several participants specifically praised:
- spending time with each person, including beginners
- giving hands-on feedback on composition and settings
- doing demonstration-style teaching, then letting you practice right away
- staying attentive in crowds so you don’t get separated
There’s also a helpful “real night” detail: one person mentioned that when it rained, the guide used alternate plans. That matters because Tokyo nights can change fast, and a good guide doesn’t treat the itinerary like it’s written in stone.
If you’re a first-timer, this is the kind of tour where you leave feeling like you can repeat the method later. You don’t just collect photos; you learn the process.
Price and Value: $184.99 for Up to Two People
At $184.99 per group (up to 2), the pricing is easiest to swallow if you’re splitting it. If two of you book, it becomes roughly $92.50 per person. That’s usually more than a casual walking tour, but it’s in line with a photo-instructor session that’s designed around timing, instruction, and targeted shooting locations.
What you’re paying for here:
- a professional photography instructor
- a route through three specific night photo environments
- guidance for both camera and smartphone shooting
- small-group attention (max 4 travelers), which reduces time wasted on “figure it out yourself”
Your extra costs are minimal but real. The transfer to Shibuya is at your own expense, and bus fare isn’t included. Still, compared to the cost of missing good night light while you’re wandering the districts alone, this price can feel fair.
I’d consider it especially good value if you:
- want better nighttime shots but don’t know how to set up long exposure
- are traveling with someone and you both like photos
- want a short, focused session rather than a full-day commitment
Logistics That Actually Matter: Meeting Point, Walking Speed, and Timing
This tour starts at the Happy Lemon Keio Shinjuku Shop, 1-chōme-1-4 Nishishinjuku, Shinjuku City, Tokyo 160-0023, Japan, at 7:00pm. It ends near Shibuya at 2-chōme-2-1 Dōgenzaka, Shibuya, Tokyo 150-0043, Japan. A mobile ticket is used.
Shinjuku is big. One review warned that the station area is huge and easy to get lost in. If you arrive early, don’t just stand near a generic entrance—take a minute to locate the exact meeting point. If you show up late, the brisk pace becomes a problem fast, because you might miss the best part of a timed photo spot.
What to bring:
- your camera or smartphone with enough battery
- something to steady your shot (a tripod helps if you own one)
- a willingness to walk and shoot quickly
If you’re slower-paced or you need extra time reviewing shots on your screen, tell the guide early. Most guides can adjust, but you’ll have a better time if expectations are clear from the start.
Who This Tour Suits Best (and Who Might Not)
This is a strong fit if you want:
- a guided street photography night in Shinjuku + Shibuya
- practical instruction for neon, crowds, and long exposures
- an experience that doesn’t assume you already know camera settings
One review specifically noted it’s good even if you’re not an experienced shooter. Another emphasized that phone users can get genuinely better results with the right guidance.
You might think twice if:
- you prefer slow, unstructured wandering
- you expect deep cultural or historical storytelling
- you’re very sensitive to pace and group dynamics
A photo tour is exactly that: a photo workshop in motion. If you want a relaxed “see Tokyo” walk with no shooting pressure, this might feel a bit strict.
Should You Book This Tokyo Night Photo Tour?
Book it if your goal is simple: come away with better neon night photos and learn how to recreate the results later. The small group size, pro-led feedback, and the specific stop sequence make it more efficient than trying to figure out Shinjuku and Shibuya on your own.
Skip it (or pair it with a different kind of plan) if you need a slow pace, long downtime, or you mainly want sightseeing and atmosphere without the photography focus. And be honest with yourself about the meeting point challenge in Shinjuku—arrive early, find the exact spot, and be ready to shoot right away.
If you do those two things, you’ll get what this tour is built for: neon street scenes, crowd-motion creativity, and practical night photography skills that stick.
FAQ
How long is the Tokyo Cyberpunk Street Photo Tour?
It runs about 3 hours (approx.), and the experience description also notes around 2.5 hours of guided time.
What time does it start, and where does it meet?
The tour starts at 7:00pm. The meeting point is the Happy Lemon Keio Shinjuku Shop, 1-chōme-1-4 Nishishinjuku.
Where does the tour end?
It ends in Shibuya at 2-chōme-2-1 Dōgenzaka.
How many people are in the group?
The tour has a maximum of 4 travelers, keeping it a small-group experience.
What neighborhoods and photo stops are included?
You’ll visit Kabukicho District (1 hour), Omoide Yokocho Memory Lane (30 minutes), and Shibuya Crossing (45 minutes).
Is the tour suitable if I don’t have photography experience?
Most travelers can participate, and the tour is designed for both beginners and experienced photographers, including people who mainly use smartphones.
What’s included in the price?
The included item listed is a professional photography instructor.
Is any transportation cost included?
Bus fare is not included. The tour also involves taking a train to Shibuya at your own expense.