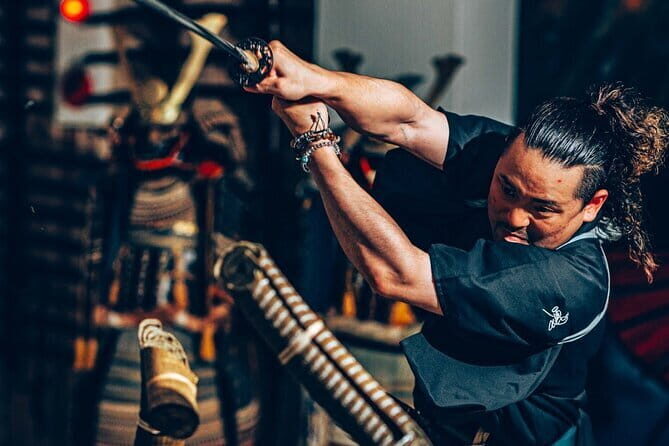
REVIEW · KYOTO
Authentic knife making experience at a blacksmith in Kyoto
Book on GetYourGuide →Operated by Kendo Experience · Bookable on GetYourGuide
Knife making in Kyoto is not a museum thing.
You’ll do real blacksmithing steps and end up with a take-home blade you actually can use at home. I like that the process is hands-on from glowing steel to sharpening, and I also love the focus on safety and instruction from Mao, a seasoned knife professional. The main drawback is simple: this is physical work near heat, so you should stretch, take it slow, and expect some strain.
You’ll also find it easy to plug into a day in Kyoto because the studio is close to the Eizan Electric Railway, with staff operating from two Sakyo-ku studios (Studio NIN Yase or Studio NIN Kendo). One more consideration: there can be confusion if you arrive assuming it’s only one address, so give yourself a little time to confirm which studio you’re assigned.
In This Review
- Key points at a glance
- Where This Kyoto Knife Workshop Really Happens: Sakyo-ku, Near the Train
- Your First Hour: Costume, Tools, Safety, and How the Process Starts
- Forging 101: Heating Steel Until It Glows Red-Hot
- The Highlight: Hammering Your Blade Under Close Guidance
- Cooling, Refining, and Getting Ready to Sharpen
- Sharpening Time: Turning a Shaped Blade Into an Edge
- Polishing, Final Finish, and What You Take Home in the Box
- Price and Value: Why $154 Feels Fair for a Real Handmade Knife
- Who Should Book This Knife Workshop (and Who Should Skip It)
- Practical Tips So Your Session Goes Smoothly
- Should You Book This Kyoto Knife-Making Experience?
- FAQ
- How long is the Kyoto knife-making workshop?
- What knife will I make, and can I take it home?
- Where do I meet, and is it close to a train station?
- Which studio will I attend: NIN Yase or NIN Kendo?
- What should I bring?
- Is alcohol allowed during the workshop?
- Who can join, and are there age limits?
- Is the instruction available in English?
Key points at a glance
- One-minute walk from the Yase-Hieizan Exit: The meeting spot at Studio Shinobi YASE is right by the station.
- Mao leads a full knife-making flow: From tool safety to forging, sharpening, and polishing.
- You make a practical Japanese-style knife: A handmade blade around 13–15 cm.
- You get what you need on site: Costume, towel, water, tools, materials, and packaging are included.
- Small-group attention: You’re not just watching; you get hands-on guidance.
- You can capture the process: Photos and videos are welcome throughout.
Where This Kyoto Knife Workshop Really Happens: Sakyo-ku, Near the Train
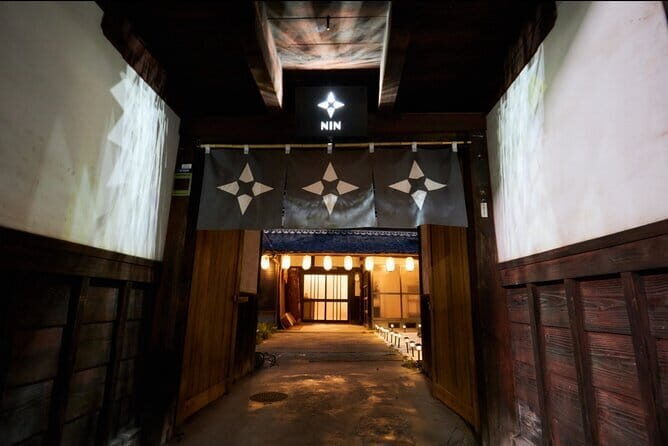
This class takes place in Honshu, in Kyoto’s Sakyo-ku area, and the biggest win for most people is the location. The meeting point is Studio Shinobi YASE (168-1 Yase-no-secho, Sakyo-ku). It’s a one-minute walk from the Yase-Hieizan Exit of the Eizan Electric Railway, so train travel is the smart move here.
The studio setup is also important. The provider works out of two studios in Sakyo-ku: Studio NIN Yase and Studio NIN Kendo. Staff message you before your visit to confirm which location you should attend. I’d plan like you’re doing a practical appointment, not a drop-in walk-up. Have the message ready on your phone when you arrive.
Also, don’t bring alcohol to the studio area. And yes, taxis are available if you prefer a door-to-door ride, but the station proximity is the easier approach for most schedules.
You can also read our reviews of more tours and experiences in Kyoto.

Your First Hour: Costume, Tools, Safety, and How the Process Starts
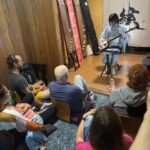
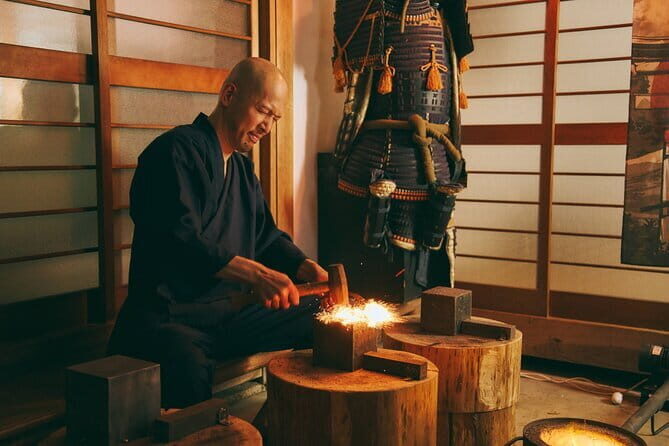
The session begins with check-in at the studio. You’ll be greeted by your instructor, Mao, who has over 10 years of experience in knife work. Early on, the tone shifts fast: you change into traditional blacksmith attire—the craftsman’s uniform that Japanese smiths wear. It sounds like a small detail, but it matters. You’re not just learning craft theory. You’re stepping into a real workshop routine.
Next comes tools and safety. They’ll show you how to handle core equipment such as hammers, tongs, and grinders, and they’ll explain the rules that keep your day moving smoothly. You should treat this part seriously. Even with close guidance, the activity includes work with danger potential (hot metal and heavy tools), and in the unlikely event of injury or accident, you’re responsible. That’s not meant to scare you. It’s meant to keep you alert.
If you’re a first-timer, go in expecting to be taught basic technique. This isn’t a vibe-only class where you hold a hammer for a photo and call it done. The structure is time-ordered: learn what the tools do, learn the safety rhythm, then start forging.
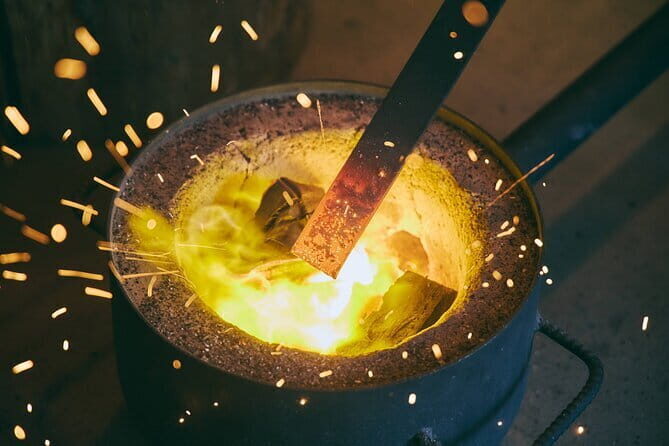
Forging 101: Heating Steel Until It Glows Red-Hot
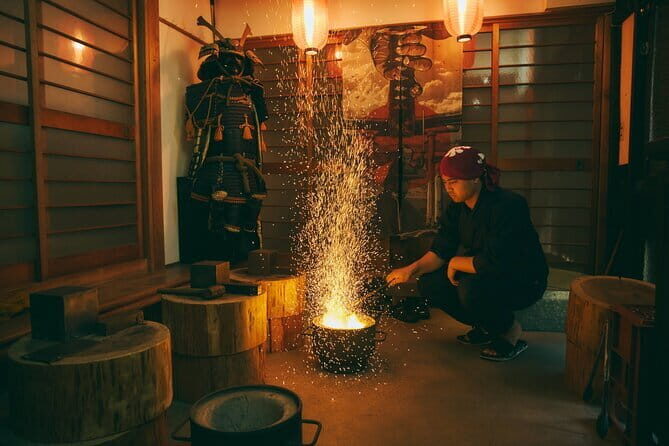
Then comes the part you’ll remember later, even if you’re not a craft person. The raw steel is placed into the furnace and heated until it glows red-hot. That moment changes everything. You’ll feel the heat, you’ll watch the color shift, and you’ll realize forging is less about talent and more about timing, angle, and control.
Mao explains the traditional techniques used to craft Japanese kitchen knives and how each step transforms raw steel into a blade. You’re not expected to understand metallurgy overnight, but you will understand the workflow: heat the stock, forge it closer to shape, cool it, refine, and repeat.
One detail I’d call out: forging is hot, physical, and tiring. Many participants mention the heat and the effort of hammering. The team also helps practical comfort where possible, like air conditioning and cooling support (one review specifically noted frozen neck coolers). Still, assume you’ll be sweating. Wear the socks you’re asked to bring, and be ready for a workout.
The Highlight: Hammering Your Blade Under Close Guidance
This is where you stop being a spectator. Guided closely by Mao, you’ll strike the glowing steel repeatedly with a hammer. You’ll learn the correct hammering angle and rhythm, plus the precision needed to avoid sloppy shaping.
If you’ve never held a hammer in anger, you might get surprised by how demanding it is. People describe it as physically active, and the work near heated metal is not casual. The good news is that instructors are watching your technique and stepping in to help. You’ll still feel pride because the blade is yours, but you’re not left to figure it out alone.
A few other practical points that help your result:
- Start with good posture and take breaks when you need them.
- Pay attention to angle more than force. Straight, controlled strikes beat wild swings.
- If you’re making the knife a gift, remember that small shaping choices are what make it feel personal.
There’s also something psychologically satisfying about this stage. You watch a chunk of metal become something blade-shaped. It’s slow enough to learn, fast enough to stay excited.
Cooling, Refining, and Getting Ready to Sharpen
After forging, the metal is cooled and checked for shape. This is the phase that separates nice-looking from usable. You’ll refine rough edges and prepare the blade for sharpening.
This step can feel less dramatic than hammering, but it matters. If you rush it, sharpening won’t land correctly. If you do it carefully, the later edge work becomes much easier. Mao’s guidance is the key here, because even beginners are guided toward making a functional blade using tools like sharpening stones and grinders.


Sharpening Time: Turning a Shaped Blade Into an Edge
Next you move into sharpening. Under expert instruction, you use sharpening stones and grinders to bring the edge to life. This is where your knife stops being a souvenir and becomes something you can actually use.
What I like about this part is that it teaches you to respect the edge. You’re not just grinding metal. You’re shaping how the knife cuts, and you learn the idea that the sharp part is a process, not a miracle.
A few participants specifically mention how fun it was to go from pounding to shaping to sharpening. I’d agree with that arc. The whole session has a clear line: heat and hammer first, then precision and finish work, then you finally see the knife come together as a real object.
Polishing, Final Finish, and What You Take Home in the Box
Once sharpening is done, you polish the blade to a clean, elegant finish. The workshop also provides packaging: a box and a bag, plus the included materials and tools used during the class. The result is a knife roughly 13–15 cm long, fully handmade and ready to take home.
Finish style is part of the personality here. One participant noted the knife finish is Kurouchi, a rustic, rawly forged look that also helps with anti-rust. If you prefer a mirror shiny blade, you might want to ask during the session what finishing style you’re aiming for, because that raw charm is the point for many people.
Photos and videos are welcome throughout the process, so you can document your heat-to-edge transformation without feeling like you’re disrupting the class. That’s useful later, especially if the knife is a gift and you want to remember what you did to make it.
Price and Value: Why $154 Feels Fair for a Real Handmade Knife
At $154 per person for around 3 hours, this workshop is priced like a premium experience because you’re taking home a usable handmade knife plus instruction through the whole process. You’re not only paying for a finished souvenir. You’re paying for:
- A trained instructor (Mao) guiding you through the hardest parts
- Tools, materials, and safety setup
- Time and supervision during forging at high heat
- The sharpening and finishing steps that turn metal into something practical
If you’ve ever priced knives in Japan, you’ll notice that a real blade costs real money. Here, you’re getting the blade and the story, and the story is the skill-building part. You’ll likely still feel humbled by the work. Reviews mention it’s harder than expected, and that’s actually part of why the finished knife feels meaningful.
Is it the cheapest activity in Kyoto? No. But it’s also not a show. You’re doing a craft that’s extremely rare even within Japan, and you’re leaving with something you can use, not just something you can hang on a shelf.
Who Should Book This Knife Workshop (and Who Should Skip It)
This is a great fit if you want hands-on travel that isn’t watered down. You’ll enjoy it if you like making things with your hands, want a memorable gift, or simply want a deeper look at Japanese blacksmithing than you’ll get from a standard cultural stop.
It also suits people who value practical souvenirs. The knife you make is designed to be functional for everyday use, not just decorative. And because you receive the packaging (box and bag), it’s gift-ready.
Skip it if:
- You want a low-effort, seated experience. Hammering is work.
- You don’t handle heat well or you’re not comfortable with safety guidelines around tools.
- You’re traveling with someone who doesn’t meet the limits. Children under 15 must be accompanied by a guardian, and the workshop isn’t suitable for people over 95 years.
Also, if you’re the kind of person who hates tight instructions, this might frustrate you. The class has clear steps and rules because you’re working near hot metal. That’s good for safety, but you have to listen and cooperate.
Practical Tips So Your Session Goes Smoothly
A few small things can make a big difference:
- Bring socks, as requested. This is one of those items people forget.
- Arrive a few minutes early. One review noted confusion because there are two studios; staff will message you, but your best move is arriving ready to check the assigned location.
- Stretch before you go. People explicitly recommend stretching, and it makes sense when you’re hammering and holding angles for long stretches.
- Expect to be hot and tired. Even with cooling support, forging involves high temperatures and heavy motion.
- If you’re picky about the final look, pay attention during finishing. One person warned not to chase silver and shiny, because the charm of the Kurouchi style is part of the value.
One last thing: instructors speak both English and Japanese, and the workshop offers a small-group format. That means you can ask questions and get help without feeling lost in a crowd.
Should You Book This Kyoto Knife-Making Experience?
Yes, if you want a genuinely hands-on Kyoto activity with an outcome you’ll use. A home-forged knife is the kind of souvenir that beats magnets because it doesn’t just sit there. It performs. And the process is guided step by step by Mao and the team, so you’re not left guessing.
No, if you want a passive culture lesson, or if you know you won’t enjoy physical, near-heat work. This class is built around hammering, shaping, sharpening, and polishing. If that sounds like your kind of day, you’ll come away with a blade and a story you’ll keep retelling.
If you book, do yourself a favor: plan transport early, confirm your studio assignment, wear clean socks, and show up ready to work with both attention and patience.
FAQ
How long is the Kyoto knife-making workshop?
The workshop runs for about 3 hours. The refined format is described as 2.5 hours as well, so plan for a half-day slot.
What knife will I make, and can I take it home?
You make a fully handmade Japanese-style knife, roughly 13–15 cm long, and you take it home. The workshop also includes a box and a bag for bringing it back.
Where do I meet, and is it close to a train station?
Meet at Studio Shinobi YASE (168-1 Yase-no-secho, Sakyo-ku, Kyoto City). It’s a one-minute walk from the Yase-Hieizan Exit of the Eizan Electric Railway.
Which studio will I attend: NIN Yase or NIN Kendo?
You’ll be told in advance which studio to attend. The provider operates out of two studios in Sakyo-ku: Studio NIN Yase and Studio NIN Kendo.
What should I bring?
Bring socks. The rest of the main workshop items like costume, towel, water, tools, materials, and packaging are included.
Is alcohol allowed during the workshop?
Alcohol and drugs are not allowed.
Who can join, and are there age limits?
Children under 15 must be accompanied by a guardian. The workshop is not suitable for people over 95 years.
Is the instruction available in English?
Yes. Instruction is available in English and Japanese, and the class is offered as a small group.