REVIEW · KYOTO
Kyoto: Ninja Weapon Forging Experience
Book on GetYourGuide →Operated by Kendo Experience · Bookable on GetYourGuide
Some activities in Kyoto are pretty. This one is hot.
I really like that you work with real steel, not cheap cosplay props, and you can feel the process as it goes from orange-hot metal to a finished piece you’ll display. I also like the personalization side: you choose a kanji character, then finish the weapon so it looks dramatic in its own box.
One thing to think about: if you want the kunai option (or certain other weapons), there’s an extra fee on top of the main price.
In This Review
- Key highlights to know before you go
- From Hieizanguchi Station to a real blacksmith shop vibe
- Suit up in samue and pick your ninja weapon
- The forging step: heating steel and shaping it by hand
- Refining with tools: beltsanders, sharpening choices, and clean lines
- Kanji engraving: your character becomes part of the weapon
- Blackening and finishing: make it look like a shadow-tool
- Learn the ninja story while your hands are busy
- Photos, video, and the little things that help you remember
- Cost and value: what you’re paying for (and what can cost extra)
- Flying home with your weapon: pack it like you mean it
- Who this is best for in Kyoto
- Should you book the Ninja Weapon Forging Experience in Kyoto?
- FAQ
- What weapon can I make in this Kyoto experience?
- How long is the experience?
- What is included in the price?
- Is the instructor available in English?
- Will I need to pay extra fees?
- Where do I meet for the workshop?
- Can I bring the weapon home on a plane?
- Are replica swords available to buy?
- What if my plans change?
Key highlights to know before you go
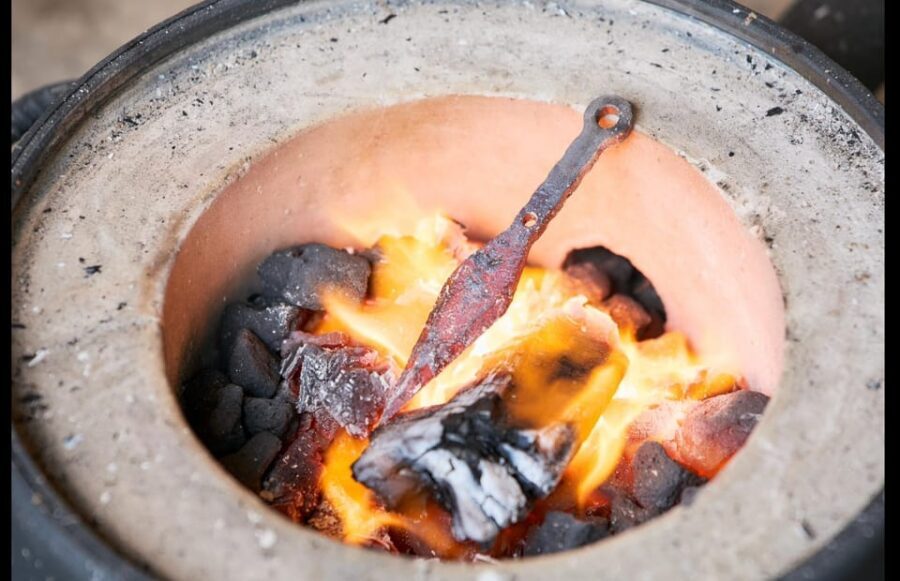
- Real forging at 800°C: you heat your metal in a furnace and hammer as sparks fly
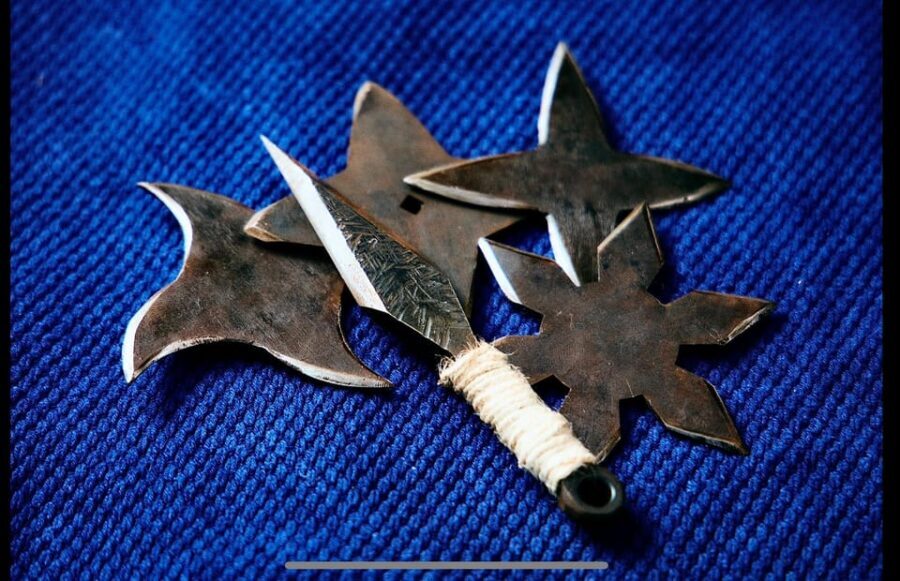
- Choose your weapon style: shuriken options or a kunai (kunai has an extra ¥3,000 fee)
- Kanji engraving as your signature: pick a character that means something to you
- Protective finishing: blackening solution to darken the steel and help prevent rust
- Take-home packaging: your weapon comes in a box you can keep for years
- Convenient meeting spot: a short walk from Hieizanguchi Station, with clear landmark directions
From Hieizanguchi Station to a real blacksmith shop vibe
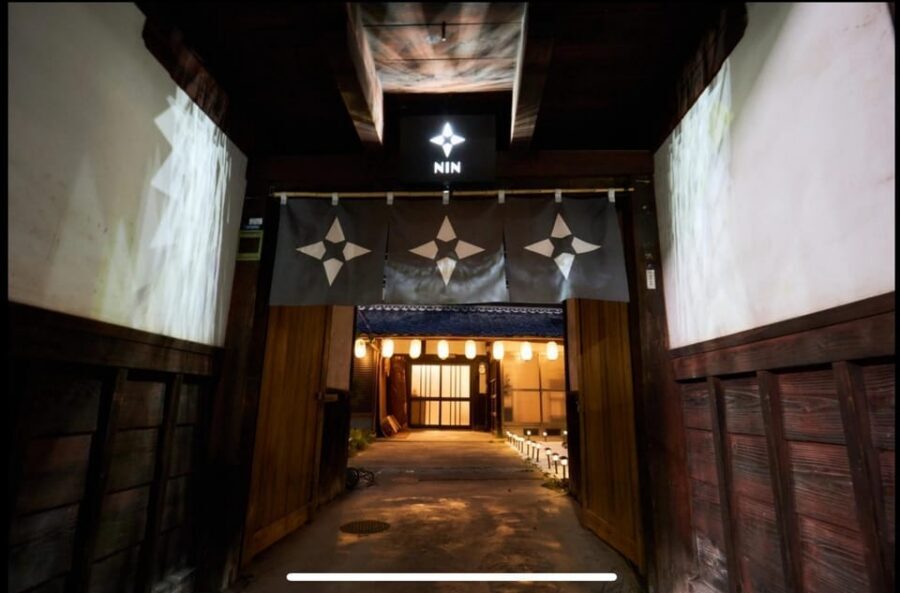
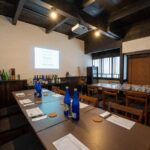
This experience is tucked into a studio close to Kyoto by train, with the meeting point just a minute’s walk from Hieizanguchi Station. Go up the hill where there’s a red postbox in front of the station. That detail matters, because the studio isn’t a major landmark you’ll stumble across on accident. Once you find the right turn uphill, everything gets easy.
Timing-wise, you’re looking at about 150 minutes. In a city where you can easily lose an hour just crossing streets and waiting for lights, that’s a sweet length: long enough to feel like you actually made something, not so long that it swallows your whole day. It also makes this a good activity if you want a change of pace from temples and food lines.
You can also read our reviews of more tours and experiences in Kyoto.

Suit up in samue and pick your ninja weapon
Before you touch anything, you change into samue, the traditional work clothes worn by Japanese blacksmiths. A tenugui is wrapped around your head, which instantly makes the whole thing feel like a craft session, not a theme park photo-op.
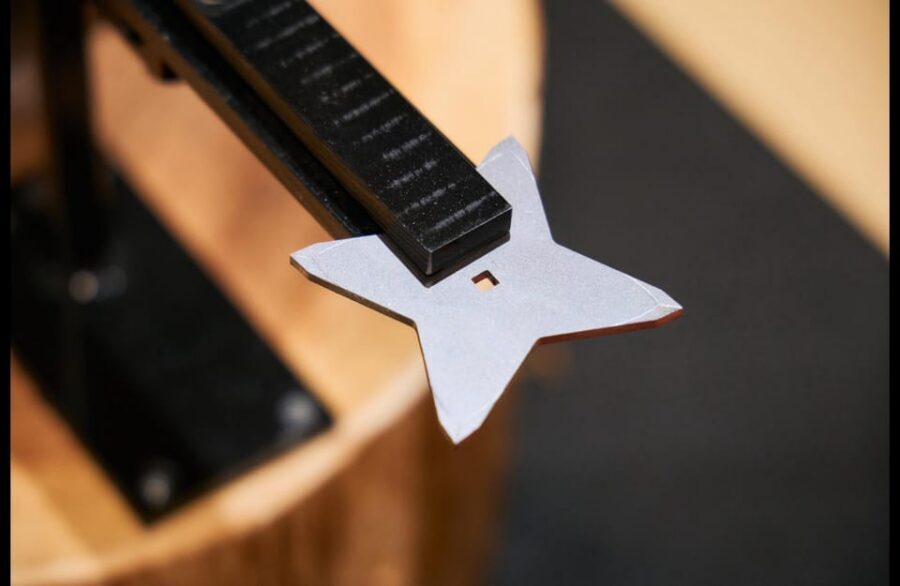
Next comes the part where your souvenir starts to feel personal: you choose what you’ll make. You can select three shuriken styles or the kunai. If you want the kunai, reserve it using the kunai option, and plan for an additional fee of ¥3,000 to cover processing and material costs.
This choice affects more than just the final look. Shuriken styles and kunai have different shapes and balance, so it’s worth thinking about what you want your end product to represent. If you’re drawn to the classic ninja throwing-star vibe, go shuriken. If you like a more utilitarian, tool-like look, the kunai is the move.
The forging step: heating steel and shaping it by hand
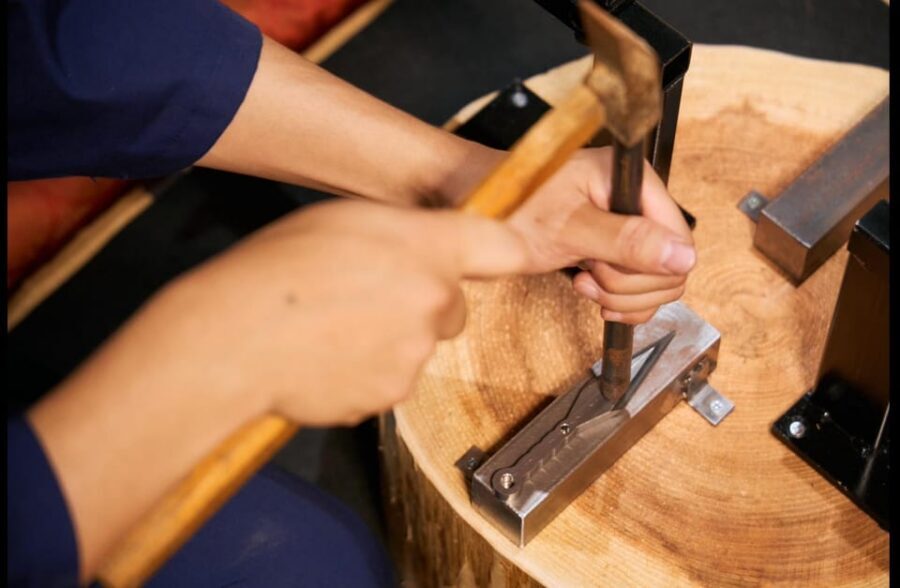
Now for the highlight. You’ll watch your metal glow inside an 800°C furnace. Then you hammer. Real steel, real heat, and real physical work. It’s the kind of thing that makes you understand why forging traditions are treated like skills worth preserving.
What makes this valuable for you is the rhythm. You’re not just standing there while someone else performs. You’re guided through strikes and shaping so you can experience the transformation stage-by-stage. Sparks aren’t just dramatic; they’re telling you the metal is ready to be worked.
You also get support from the instructors throughout. In English, the team is known for moving between groups and giving clear guidance when you need it. Names that show up repeatedly in English-guide praise include Taka, Mits, Ako, and Yok. Even when you’re in a group, you’re not just tossed into the deep end and left to figure it out.
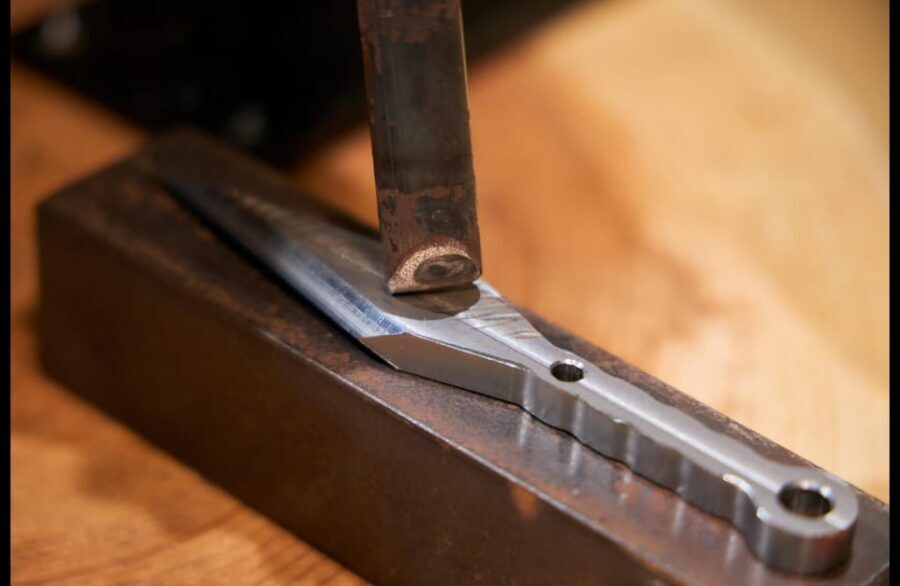
Refining with tools: beltsanders, sharpening choices, and clean lines

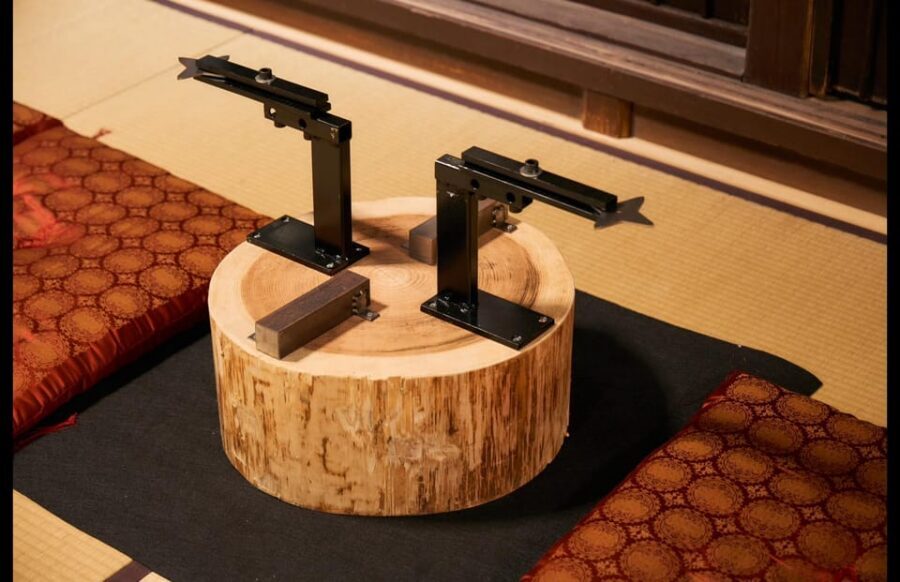
Once the blade or weapon shape is there, the work shifts from heat to precision. You use a professional belt sander to refine the blade and clean up the form. That’s where your piece starts to look less like a rough blank and more like a finished “artifact.”
This is also where your preferences can matter. Some participants note they can choose how sharp they want their weapon to be, which can be helpful if you’re thinking about carrying it home or bringing it into a classroom environment. Even if you aren’t trying to maximize sharpness, you’ll still get the satisfaction of sanding and polishing as the geometry tightens.
Kanji engraving: your character becomes part of the weapon
After shaping and refinement, you get the signature step: kanji engraving. You choose a kanji character that inspires you, then the staff helps translate that choice into careful engraving.
This is a smart way to make the souvenir feel like yours. Anyone can buy a decorative ninja star. Fewer people leave Kyoto with something that literally carries meaning they selected. The kanji step also gives you a mental link between modern you and historical craft culture, because the character choice becomes a quiet personal story attached to the object.


Blackening and finishing: make it look like a shadow-tool
Next comes blackening the steel. A special solution is applied to darken the metal and protect it from rust, giving your weapon an elegant finish. It’s not just cosmetic. Darkening helps the surface resist corrosion, which matters if you plan to keep your piece out of a drawer and enjoy it long-term.
Finally, you do the last polishing. That final phase is where the weapon shifts from “made” to “display-worthy.” You’ll typically leave with something you can show on a shelf, in a case, or inside the included box.
Some steps also include adding the final presentation details, such as choosing a cord or finishing element, so your end product feels complete rather than unfinished.
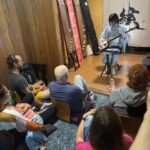
Learn the ninja story while your hands are busy
Half the appeal here is craft, half is context. You get a ninja knowledge session that covers history, symbolism, and hidden techniques tied to ninja culture. This part is valuable because it stops the experience from becoming pure action.
If you like understanding what you’re doing, you’ll appreciate the cultural layer. A lot of participants also mention leaving feeling like they gained a new interest in the craft and its traditions, not just a random souvenir.
The best version of this session is when the instructors explain how and why the techniques are done the way they are. The team energy described in English-guided sessions—people like Taka and others—tends to keep it lively without turning it silly.
Photos, video, and the little things that help you remember
You can capture memories with photos and videos of your crafting experience. More than one person notes the staff even helps with filming, which is handy because the forging and shaping parts are fast, and you don’t want to miss the key moments while fumbling with your phone.
If you want good footage, bring a camera you’re comfortable using one-handed. Some of the action happens during brief steps when you’ll want to switch between looking at the piece and documenting what’s happening.
Cost and value: what you’re paying for (and what can cost extra)
The price is $148 per person for the full 150-minute session. For what you get, the value is driven by three factors:
- You work with real steel and real tools.
- You take the weapon home, in a presentation box.
- You get multiple stages: forging, precision shaping, kanji engraving, blackening, and final polish.
That’s not a “watch and make one tiny thing” workshop. It’s a full build experience.
Watch for extra fees. If you choose the kunai, there’s an additional ¥3,000. The studio also indicates that some weapons may cost more depending on what you select. The studio sells replica swords too, but those are separate purchases if you want them.
So, your best budgeting move is simple: decide in advance whether you want shuriken or kunai, then pick based on the style you genuinely want to own.
Flying home with your weapon: pack it like you mean it
Your weapon is something you’ll bring home, and you can take it on flights, but you must put it in checked luggage, not carry-on. That’s the main travel constraint you should plan around.
The good news is that the weapon comes in a box, which helps with packing and reduces the chance of damage in transit. Still, treat it like a real artifact: wrap it securely and keep the box intact so the finish arrives safely.
Who this is best for in Kyoto
This is a great pick if you want a hands-on Kyoto experience that’s different from sightseeing-only days. It suits:
- People who like making things with their hands
- Families who want a structured, instructor-led activity
- Culture-minded travelers who want craft history, not just a quick photo
- Souvenir buyers who hate generic mass-market items
It may be less ideal if you want a low-effort experience, or if you’re hoping for a purely scenic, sit-back cultural walk. This one is work. Fun work, but work.
Should you book the Ninja Weapon Forging Experience in Kyoto?
If you want a Kyoto memory you can hold, I’d book it. Between the real steel forging, the kanji personalization, and the full finishing process (blackening and polishing), you get a souvenir with actual craft behind it, not just branding.
Book it especially if you’re excited by the idea of shaping metal at high heat and leaving with the finished piece in a nice box. If you’re leaning toward a kunai, factor in the extra ¥3,000 so there are no surprises.
Skip it if you only want to watch, or if you’re not comfortable with the checked-luggage rule. But if you’re okay planning for that, this is exactly the kind of Kyoto activity that makes the trip feel more like participation than consumption.
FAQ
What weapon can I make in this Kyoto experience?
You can choose from three shuriken styles or a kunai. If you want the kunai, it has an additional fee.
How long is the experience?
The class runs for about 150 minutes.
What is included in the price?
Included are the instructor, the weapon-making class, the uniform, the tools, and the weapon you make to take home.
Is the instructor available in English?
Yes. The instructor provides the experience in English.
Will I need to pay extra fees?
Some weapons may require an additional fee. For the kunai option, there is an extra ¥3,000 fee for processing and material costs.
Where do I meet for the workshop?
Meet at a 1-minute walk from Hieizanguchi Station. Go up the hill where there is a red postbox in front of the station.
Can I bring the weapon home on a plane?
Yes, but it must go in checked luggage only. It should not be carried on.
Are replica swords available to buy?
Yes. The studio sells replica swords for an additional fee.
What if my plans change?
You can cancel up to 24 hours in advance for a full refund.